Friday, October 23, 2009

Taking Student Blogs to Nth Degree at M.I.T.

CAMBRIDGE, Mass. — Cristen Chinea, a senior at M.I.T., made a confession in her blog on the college Web site.

“There’ve been several times when I felt like I didn’t really fit in at M.I.T.,” she wrote. “I nearly fell asleep during a Star Wars marathon. It wasn’t a result of sleep deprivation. I was bored out of my mind.”
-
Still, in other ways, Ms. Chinea feels right at home at the institute — she loves the anime club, and that her hall has its own wiki Web site and an Internet Relay for real-time messaging. As she wrote on her blog, a hallmate once told her that “M.I.T. is the closest you can get to living in the Internet,” and Ms. Chinea reported, “IT IS SO TRUE. Love. It. So. Much.”
-
Dozens of colleges — including Amherst, Bates, Carleton, Colby, Vassar, Wellesley and Yale — are embracing student blogs on their Web sites, seeing them as a powerful marketing tool for high school students, who these days are less interested in official messages and statistics than in first-hand narratives and direct interaction with current students.
-
But so far, none of the blogs match the interactivity and creativity of those of the Massachusetts Institute of Technology, where they are posted prominently on the admissions homepage, along with hundreds of responses from prospective applicants — all unedited.
-
Not every admissions office has been so ready to welcome uncensored student writing.
“A lot of people in admissions have not been eager for bloggers, mostly based on fears that we can’t control what people are saying,” said Jess Lord, dean of admissions at Haverford College, which posted student bloggers’ accounts of their summer activities this year, and plans to add bloggers this spring to help admitted students hear about campus life. “We’re learning, slowly, that this is how the world works, especially for high school students.”
-
M.I.T.’s bloggers, who are paid $10 an hour for up to four hours a week, offer thoughts on anything that might interest a prospective student. Some offer advice on the application process and the institute’s intense workload; others write about quirkier topics, like warm apple pie topped with bacon and hot caramel sauce, falling down the stairs or trying to set a world record in the game of Mattress Dominos.
Posting untouched student writing — and comments reacting to that writing — does carry some risks. Boring, sloppily written posts do nothing to burnish an institutional image, college admissions officials say, and there is always the possibility of an inflammatory or wildly negative posting.
=
-Pomona has considered having student bloggers, but so far has felt that the risks outweigh the benefits, said Art Rodriguez, senior associate dean of admissions.
“Blogs can certainly help humanize the process,” Mr. Rodriguez said. “The flip side is that a few anxious high school students may think and worry too much about what someone wrote on their blog, and present themselves in a slightly different way than who they really are. And there’s always the concern about the political ramifications, that bloggers may open up an issue or topic that starts something negative.”
-
But Mr. Lord of Haverford said prospective students’ interest in the summer bloggers calmed his worries.
“High school students read the blogs, and they come in and say ‘I can’t believe Haverford students get to do such interesting things with their summers,’ ” he said. “There’s no better way for students to learn about a college than from other students.”
-
Many high school seniors avidly follow student blogs at the colleges they are interested in, and post comments. Luka, one of dozens responding to Ms. Chinea, for example, wrote: “I didn’t know about the anime club. I would have never guessed that people at M.I.T. are interested in anime. Oh well … +1 on my ‘Why should I go to M.I.T.’ list.”
M.I.T.’s student bloggers said they had read the blogs when they were applying, posted comments and connected with other applicants.
-
“I was blogging myself, almost every day, when I was in high school, and I read the M.I.T. blogs all the time,” said Jess Kim, a senior blogger. “For me they painted a picture of what life would be like here, and that was part of why I wanted to come.”
Ben Jones, the former director of communications at M.I.T.’s admissions office, began with a single blog by a student five years ago, at the dawn of the Facebook era, and noticed high school students responding right away. “We saw very quickly that prospective students were engaging with each other and building their own community,” said Mr. Jones, who now works at Oberlin College, where he has added blogs to the Web site.
-
The M.I.T. student bloggers have different majors, ethnicities, residence halls and, particularly, writing styles. Some post weekly or more; others disappear for months. The bloggers are sought out as celebrities during the annual “Meet the Bloggers” session at Campus Preview Weekend.
-
M.I.T. chooses its bloggers through a contest, in which applicants submit samples of their writing. “The annual blogger selection is like the admissions office’s own running of the bulls,” said Dave McOwen, Mr. Jones’s successor in the admissions office, in his message inviting applications.
-This year, 25 freshmen applied for four new spots, and, Mr. McOwen said, it was hard to choose.
-
-“You want people who can communicate and who are going to be involved in different parts of campus life,” he said. “You want them to be positive, but it’s not mandatory.”
-
And not all posts are positive. Ms. Kim once wrote about how the resident advising system was making it impossible for her to move out of her housing — expressing enough irritation that the housing office requested that the admissions office take her post down. Officials refused, instead having the housing office post a rebuttal of her accusations; eventually, the system was changed.
-
But most of the blogs are exuberant, lyrical expressions of the joys of M.I.T. life, like last month’s post on returning as a sophomore:
-
“Something’s changed,” wrote Chris Mills. “Now you know what you’re in for, you know the sleepless nights and frustrations are never far away, but this knowledge can’t seem to remove the exhilarating smile on your face. And it’s in that masochistic moment that you realize who you are. That this is what you’re made for.
http://www.nytimes.com/2009/10/02/education/02blogs.html?ref=technology&pagewanted=print

Blog early, blog often, promote your business

If you want to connect with customers and conduct viral marketing in UK, Ireland and New Zealand, Bebo is the social networking business for you. You can create applications and widgets use your profiles to interact with other members. Bebo allows profiles to be private to anyone but friends as part of their safety net. This might hinder connectivity with potential clients but you are generally safe from hackers.

Bebo has over 40 million members among teens and young adults, Internet-savvy users and pop-culture fans—American Idol watchers or Indie-rock bands, etc. This is an excellent site to grow your business in the areas of photo or video sharing online media and event promotions and if you are targeting teenagers or college students. Make it easy for users to identify you by uploading a sufficiently clean and legible logo for the space allowed or something funny, clever or welcoming. Keep in mind, though, as with everything on your profile, it’s meant to represent your business.

Starr Hall, author of Get Connected: The social networking toolkit for business, says that to grow your business in Bebo, it’s important to have a lot of friends to widen your network. Since friends are visible on your profile, make sure that they are also reflecting the image you want your business to portray. It is like, tell me who your friends are and I will tell you what business you are in. Friends leave comments on your profile, so monitoring this is key to remove inappropriate postings and to respond to maintain relationships with contacts.

There is a space in this site called “Me, My Life and I,” to tell everyone about your business. It’s good to be simple and direct about your company and what it offers. Also include full contact information and a general overview. To keep your potential clients updated on everything your business is doing, make sure you blog early and often. Adding tips and tricks, extra information, and behind-the-scenes action will enhance the overall experience of your customers.

Upload pictures of your products, events or even appropriate personal photos to put a face to your business. Upload video clips to your page to share your company vision, mission, products, etc. Add music to your profile when appropriate. Keep your profile as clean and easy to read as possible. Don’t clutter it with distracting gadgets or music. Keep it professional looking. If you want to have personal information, consider having two accounts.

Joining Bebo is free, so go to
www.bebo.com   now.

If you are targeting young Hispanic users, as well as users who are located in Central America, join Hi5 for free. Or if you just want to learn and practice the Spanish language, join about 99 million members of this social networking site. With a vast membership base, it’s easy to network and promote your business through its basic offerings. You may upload your company logo, instead of your personal photo in your profile. Enter your company name in the info bar, and your link will be yourbusinessname.hi5.com. If needed, you can use another identifier if your business name is already taken. For your Philippine-based business, try yourbusinessnamePH.hi5.com.

It is important that you provide valid contact information such as e-mail address, IM screen name, phone number, postal address and web address so potential customers can get in touch with you easily. It is helpful to tell people about your business in an interesting, short and direct fashion. You may join groups or create your own in order to find potential customers who are already interested in your company products and services. In these groups, you can send messages and post-related information.

Share what’s going on with your company by posting blog updates. Blogs can explain and demonstrate products, announce events, and give behind-the-scenes information. Update your blogs regularly. You may also use videos and photos to allow potential customers to learn more about your company in an exciting and memorable way. You can even set up a channel where your friends can subscribe to make sure they don’t miss the latest videos.  Read the complete posting here http://www.manilatimes.net/index.php/business/4536-blog-early-blog-often-promote-your-business
 
Also read my new blog for new bloggers how to http://bloggingcommunicator.blogspot.com

Wednesday, October 14, 2009

Add visitor counter (statcounter) to blog

There are many free counters - Statcounter, site meter, Google Analytics. I prefer Statcounter as there is a choice of visible and invisible counter and it gives me just the statistics I need. I feel Sitemeter is more for giving nice graphs and Google Analytics gives too much statistics, only invisible counter and I think more for those e-Commerce website and those who use AdWord for advertising. 


I will describe how to add Statcounter to your blog. First to to Statcounter and sign up for an account. Sign in and then click "New project" (see screen shot below):

Statcounter new project

Get the URL of your blog. If you do not know how, refer to what is URL and how to get it and how to get URL of own blog. Copy and paste URL from clipboard into the box for "Website URL". Type the blog title in the first box. Click on the down arrow of "Category" and select a suitable category. Click "Next".

Statcounter new project

In the next page, click "Configure and Install Code":

statcounter install code

After clicking "Configure and Install Code", in the next page, you will have to chose between a visible counter and an invisible counter. We will chose invisible counter because it involves less steps. You may chose a visible counter (first choice) if you want.

statcounter invisible counter

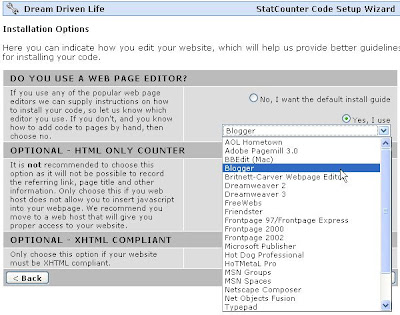
At the bottom, click NEXT. In the next page, tick "Yes I use" and then click the down arrow. Select "Blogger" (see screen shot below):

Statcounter choose Blogger

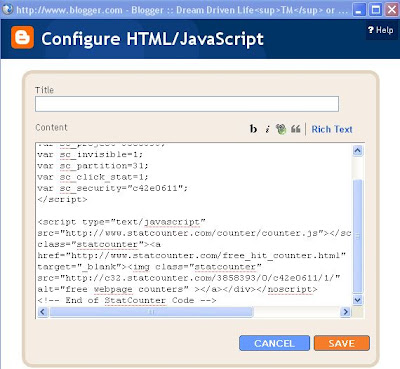
Click "Next" at the bottom, and the script for the visitor counter will be given in the next page. Click inside the box and the whole script will be highlighted. Press ctrl+C to copy script into clipboard.

Sign into blogger.com to get the Dashboard, and click LAYOUT for the blog you want to install the visitor counter. If you had selected visible counter, you will have to choose where to place the visible counter. In this case, we have chosen invisible counter, so it does not matter where. Click any one of the ADD A PAGE ELEMENT,

Blogger LAYOUT and Add a Page Element

Peter Chen's nice graphic signature

and you will get a pop-up where you will have to choose HTML/Javascript. Click inside the box, press ctrl+V to paste the script from clipboard into the box:

Script pasted into HTML Page Element

Add Music to your blog: Another easy way

Add Music to your blog: Another easy way

Here is another easy way for you to add music to your blog. Go to eSnips. There you can upload your music file and other files like videos, photos and files. Here we will just be discussing music, but videos, etc., should be no different. You can check out this post where I have used eSnips to embed a music player into the post: Testing embedding own music in post.

The best way to go is to first sign up for an account first. Then you can have a folder for your files which you can refer to whenever you need to. If you have your own music file, first upload it. You still can have music if you don't have your own music file. All you have to do is to choose one which is available to the public in eSnip. If you don't have your own music file, or you want one that is available in eSnip, click on fresh from the "DJ Community" and click on a selection. Click "MP3 Widgets" and you will be presented with a page where you can copy the script to add to your blog (see screenshot (click to enlarge):

eSnip widget preview

The default is to only play the music if a visitor click on the Play button. However, you can make the player play the music automatically the moment the page opens by choosing Yes in the Auto Play drop down menu at the bottom of the preview page (see bottom of the screenshot above). This setting (autoplay) is not favoured by many because of fear of unwanted interruption like when a person is surfing at night and there is a baby sleeping nearby. The person will have to quickly exit the site to stop the music playing. That is why the default is set to "no".

Update March 16 2007: Got a tip about Odeo from Brad of Brad Linder's Digital Home. I tested embeding a selection into this post Testing embeding musical from Odeo. However, unlike eSnip, they don't give you the option of whether you want autostart or you need the visitor to click the "play" button to play the music. In this case, a visitor will have to click the "play" button to start the music.

UPDATE 5 November 2007: See eSnip music player in sidebar for instructions on how to make the eSnip player fit the sidebar (click BACK button to get back to this page).

Listening to music online

Not satisfied with just putting music on your own site. Like to listen to music on other sites online?

Find places to Listen To Music Online for free. The internet has allowed sites to play Music 24/7. There are literally hundreds of Online Music sites
and even you can Stream Music on your own website.

Related post:
Adding Music to your blog

How to use widgets or add them to Blogspot

Over the past few weeks, I've been working with Bloggers improved API for Gadgets and have now completed work on several useful gadgets which can be installed with just a few clicks.

I've found that the Gadget API offers a much better interface to the end-user than HTML/Javascript widgets (although it takes me far longer to create Gadgets than widgets!). While they are a little more difficult to create, I think the end-product is worth the effort:

  • Gadgets can be added from within the Blogger dashboard (so we don't need to use search engines, or visit the owner's site to install).
  • Gadgets are easily customized, and can be easily reconfigured after installation
  • The new API includes the ability to include Blogger post and comment feeds for the blog in which they are installed.
  • Developers can ensure gadgets blend with the theme in which they are installed using "Skins" parameters.

How to install Gadgets in your Blogger blog

Gadgets are as easy to install as Blogger's default widgets. Simply go to Layout>Page Elements in your Blogger dashboard and click the "Add a Gadget" link in the area where you want to install your gadget.

A pop-up screen like this will appear:

From here, you can browse gadgets in the directory, search for gadgets of interest, or add a gadget using the URL where it is hosted.

Once you have chosen a gadget to add, you should be presented with a configuration screen like this:

There will be different options here, depending on the gadget you have chosen to install. This example shows the configuration options for my Twitter Updates gadget.

At the very least, you should be able to alter the title of the gadget, however most gadgets have other configuration options available. A preview of how the gadget will look in your blog will appear below these options (do bear in mind that the width of the gadget may be wider when displayed in your blog if the area in which it is added has larger dimensions than the preview screen).

Once you've changed any settings, be sure to click the "Update" link in order to see the changes appear before you save. The gadget will then appear in your blog, and it's position can be changed in the Page Elements section of your dashboard.


Blogger's Featured Gadgets

The Blogger team have created The Featured Gadgets blog which details gadgets of particular interest. Some of these gadgets are also included in the Featured Gadgets section of the Gadget directory (available when you choose to add a new gadget through your dashboard).

I'm thrilled to find four of my own gadgets are "featured": Recent Posts, Recent Comments, Picasa Photostream and Twitter Updates, and look forward to seeing the efforts of other Blogger developers in the future.  http://www.bloggerbuster.com/2009/07/new-gadgets-for-blogger.html

Wordpress or Blogger? which one is better and why?

Blogger Pros:

* Free hosting
* Drag and drop gadgets (widgets) around easily
* Owned by Google
* Easy to setup in 5 minutes
* Easy for a "newbie" to understand how to use
* You can place ads on your blog to monetize it (make money)
* You can add a custom domain without paying for hosting
* Free access to edit the HTML and CSS if you want to
* Images are hosted for free with no limits (that I see)
* Let's you export your blog for backup on your computer (posts)
* Let's you backup your template
* Creates a free archive daily, weekly, or monthly

Blogger Cons:

* Limited gadgets (widgets)
* Limited features (like WordPress plug-ins)
* Requires knowledge of HTML to add certain features
* Cannot create "real" static pages
* Limited templates available for free

Now that I gave you this list let me explain a bit more.

Pros:

Blogger is owned by Google so getting on the search engines seem to be easier. I had a couple of Blogger blogs appear on page 1 of the search engine results for my topic in 3 days using a free Blogger blog domain name (.blogspot.com). Hosting is always free even if you own a custom domain. Google allows you to monetize (make money) with your blog by adding Google Adsense ads and other ads. It takes approximately 5 minutes to set up a Blogger blog using one of their standard templates and even a person who is new to blogging can understand how to create a post within a few minutes. You can create gadgets (sometimes called widgets) easily and if you get "tired" of where they appear on the blog you just click and drag them to a new location. You cannot create a real static page using Blogger. I have, however, found a work around that makes posts look static and have gadgets appear only on the homepage.

Cons:

There are limited free, professional templates available for Blogger because more designers seem to be making templates for WordPress blogs. There are limited gadgets (widgets) available unlike WordPress which let's you install plug-ins that give you more options. The limited features I am talking about would be the plug-ins that WordPress offers such as the All-in-One SEO package, printing a page option, threaded comments, and more. These things are possible with Blogger but you would need extensive HTML knowledge to create them or at least feel comfortable "tweaking" the HTML code.

WordPress Blogging Platform

WordPress.org Pros:

This list would also include many of the Wordpress.com Pro features since it is the same system.

* Free WordPress platform software
* You can create static pages like on a website
* Free Professional templates available all over the Internet to download and upload through your Dashboard
* Thousands of free plug-ins available
* You can tweak HTML and CSS

WordPress.org Cons:

* You must pay for hosting
* You must keep your own backup
* You must figure out how to install the software on your host
* You must manually download and install all upgrades yourself

Now that I gave you this list let me explain a bit more.

Pros:

WordPress.com gives you a free blog and a wordpress.com domain address and also hosts your blog for free. It does provide some good quality templates and the ability to add widgets like link lists, HTML code, etc. There is a lot of help available on their website and WordPress has more professional-looking templates than Blogger. You can use thread comments which let's the owner of the blog reply to a comment and it stays with that particular comment instead of just showing in the list of comments. The new version is much easier to use than just several months ago. Upgrades are automatically installed for you and they backup your site. You get a certain amount of storage so you can upload pictures and videos for free until you reach that limit. The WordPress dashboard is sleek and modern looking.

Cons:

With WordPress.com (free version) you are limited to the templates available in the gallery. Although there are many professional WordPress templates available on the web you cannot use them unless you use the WordPress.org site and download the software on your own hosting account (that you pay for) and install it. Unless your host provides help this can be extremely challenging and not suggested for a newbie blogger. You also have to manually install all of the upgrades that WordPress comes out with. You cannot use the free plug-ins on the free WordPress.com site and you cannot add javascript or monetize your free blog. If you cannot add javascript then some things like adding a Twitter widget or a photo gallery widget will also not work. You cannot tweak the HTML code on the free site but you can if you pay for hosting and download the software.

Source(s):

http://answers.yahoo.com/question/index?qid=20091011013811AAv9ZFi

Tuesday, October 13, 2009

A Quick SEO Tool Search Engine Optimization

Search Engine Optimization does take a lot of time (well, if not being done right from the beginning), and the way you optimize your blog/website also changes with time. But certain SEO techniques are quite constant (at least till now). So if you want to get some traffic from the search engine giants like Google, Yahooand MSN Live, then you must consider and optimize certain features in your blog, these include (but of course not limited to):Optimizing the meta-data, optimizing the images used in your blog,domain registration, getting indexed in Google through sitemaps,adding your posts/articles to social networking sites, etc.

If you want to check your blog's present status with respect to these parameters, then you can do this quickly by visiting this website: WebSite Grader.


Simply type your blog's url and hit the "Generate Report" button. Within minutes you will get a percentile for your blog (90 percentile means out of 100 blogs you are better than 89 blogs and 10 blog are better than you).
But for you this percentile is NOT important, you should better check for the PINK boxes displayed in your result page.

Because these PINK boxes show the problems present within your blog. You must correct them and then again submit your blog, and see if your blog improves the percentile score.

PS: As there are many SEO optimizing tools and web sites available on Internet, no one can guarantee you COMPLETE success, so you must try more than one tool and try to optimize those problems which are being shown by most of those tools.  
http://bloggerstop.net/2009/03/quick-seo-tool.html

Show Only Titles In Blog Archives With Dates

You would have noticed that, visitors, do click on the monthly archive links [like Oct 2008, Dec 2008, etc. in the Blog Archive], inyour blog. But if you write a lot, like 20-30 posts in a month, then all the posts will open in the archive page and it will take a lot of time to load that page. This can be very annoying for the visitor, and he/she may simply close your blog in the frustration.
So if you want to keep your visitors happy, then you should better NOT display the content BUT only their titles in the archive results page.

For doing so, follow these steps:

Log in to Blogger
Go to Layout, and click on "Edit HTML" tab.
Now find (CTRL+F) this code in the template:


And REPLACE that line with this code:


  • I have already done this hack, in this blog, here have a look at the screen shot :


    And REPLACE that line with this code:


  • I have already done this hack, in this blog, here have a look at the screen shot :


    NOTE: Here's a new hack to show TITLES along with SUMMARY and IMAGE THUMBNAILS in Archive Pages.http://bloggerstop.net/2009/01/show-only-titles-in-blog-archives-with.html

    What Most People Search For - Which Are The Popular Keywords To Use

    Every Blogger wants huge traffic to his/her blog. Although by usingsocial networkingwebsites like StumbleUpon and Digg, you may get many visitors, but this trafficusually doesn't last long and is mainly focused to any particular page.

    So to get consistent traffic, the best option is always the major search engines like Google, Yahoo! and MSN. And even out of these search engines, the most preferred search engine is of course Google.com

    So if you want to know, exactly which keyword to use, whether to use American English or UK English (as different people use different spellings like colours or colors), visit the link below to get all your answers:

    (The tool helps people to calculate the worth of any word, by it's popularity in the global searches, but you can use it in another way too, that means, you can use those words which are mostly searched for, in your articles and posts.)


    Google Adwords Tool

    Type the words one-by-one then enter the captcha and click onget keyword ideas
    So for the words entered by you, now the results will be displayed, along with similar phrases, and you will see how many people have searched for those phrases in the recent past.
    In the Approx search volume(for last month), the numbers displayed tells you the approximate number of search queries matching your keywords that were performed on Google and the search network in the previous calendar month. This number is specific to your targeted country and language as well as your selection from the Match Type drop-down menu.

    Another way to get huge traffic, is the utilization of Hot Trends tool, given by Google Labs, which displays the 100 Most searched words in Google by the people of United States.
    Google Hot Trends (Although limited to US searches only)


    By having a look at that page, you can see what word is being searched the most in the last 1 or 2 hours, and then quickly find out why, then present the whole story in a more better way so as to attract more people. And as the story behind the keyword spreads more, & so even more number of people will start searching for it.

    The above mentioned tool is actually a part of "Google Zeitgeist", which means "the spirit of the times", and Google reveals this spirit through the aggregation of millions of search queries we receive every day. Several tools of Google give insight into global, regional, past and present search trends. These tools are available for you to play with, explore, and learn from. Use them for everything from business research to trivia answers.  http://bloggerstop.net/2008/12/what-most-people-search-for-which-are.html

    How To Track Visitors And Optimize Your Website


    You would have seen many fancy and flashy visitor counters in hundreds or rather thousands of blogs, but counting the number of visitors or page views is totally of no use to any blogger or webmaster.
    Visitor tracking is a much more advanced method as compared to those simple counters.

    So here are the four tracking websites, providing free and fabulous features to all the bloggers:

    The tracking reports and statistics from these website mainly contains:
    1. Of course unique visits and page views, averaged and archived to weekly, monthly and yearly graphs. (And all the reports are in real time)
    2. In detail, you can see their IP addresses, time spent browsingyour website, pages visited, and their returning visits. And not only these but you can even check the operating system your visitor is using, their screen resolution, their browser with version, and whether java or flash is enabled on their system or not.
    3. Along with graphs, averaged values of time spent by all visitors, location of visitors, popular pages etc. are also shown.
    4. The details you will be interested more, are of course related tosearch engine optimization, these include the keywords through which they entered your site, list of search engines which referred visitors to your website.

    For all these features you can select between SiteMeter andStatCounter.
    Although I would suggest you to go with Statcounter, as it is more user friendly, but adding both of them would be better, to get maximum possible details.


    Now third on the list is most the important of these three,Analytics from Google itself. So obviously it will not only provide complete tracking details as provided by the two above listed, but it even helps a lot in Search engine optimization.

    In Statcounter and Sitemeter, to get some of the advanced features, including an increase in log size, a paid account or an upgrade is needed, but in Google everything is free, rather they even have a beta section for interested members.

    And finally a must for everybody is an account in Google Webmaster Tools, where you have to submit your website's sitemap, and the most important details will be shown to you.
    These are although NOT about your visitors but these are ultimately aimed to optimize your website.
    You can see the number of pages indexed by Google, pages/articles deleted by you, pages restricted for Google. And you can even see how many website/webpages around the Internet have linked toyour website (and to which specific page). How well are your internal pages are connected. And again, one of the most important, you will be shown how many pages of your website has high, medium, low or no PageRank.

    So finally I will suggest you to get an account in 
    Google Analytics,
    Google Webmaster Tools,
    and Statcounter


    And just for fun, if you want to know how many people are online on your website at a time (real time), then put a widget from Amung.us, that doesn't even need you to register :)     http://bloggerstop.net/2008/11/how-to-track-visitors-and-optimize-your.html

    Change the Title Tags in Blogger for More Search Engine Traffic

     
    By default Blogger displays the blog title first, followed by the name of the post. As you might notice this is not good when it comes to SEO. It's important for the name of the post to come before the name of your blog, especially when it comes to google search results. Learn how to make your post title show up first so that you can reel in more traffic from the search engines.

    Why Change the Titles?
    It's quite important to have the Post Title + Blog Title arranged accordingly because this is how you would want your blog to be displayed on google's search results. This way more people will click on your link when searching google because the post title is more relevant than your post name.
    Example Google Search Results:
    You are most likely to click on the bottom image when searching google for the keywords "image reflection generator". The reason being is that your mind reads text from left to right. So it makes sense to have the more important title on the left.


    How to Change the Titles:
    1. Go to Layout>edit HTML in your Blogger dashboard.
    2. Search for this tag:
    3. Replace this tag with the following code:
    4. Save your template and you should see the results in your web browser as depicted in the images below.
    5. It may take a few days for the changes to show up on the google search results. I guarantee you that you will start receiving more traffic from google once you are re-indexed!


    Blogspot help links


    As Blogger gives you full access to modify the blog completely, so thanks to Blogger and all the blogger-geeks from around the world, that I am successfully able to compile these modification 'tips and tricks' which can completely modify your free blog into a problog

    General Hacks For Templates

    01. Download The Best Template for your Blog

    02. What is a blog and How to Get One

    03. Get a better domain for your blog !!! (Most Important)

    04. How to change blogger templates

    05. Back Up your blog posts and comments

    06. Remove the "Navbar" from your blog

    07. How to show HTML text in Blogger posts

    08. Add a better Favicon to your blog (Best method available on Internet)

    09. Embed the "Comments Form" just below your blog post

    10. How to add a post to all Social Networking Websites at Once

    11. How to add/change background image in Blogger

    12. New fonts for Blogger

    13. Create a professional "Contact Me" page in Blogger Blogs

    14. Add 3 new widgets, at the bottom of your blog

    15. Convert your blog from Blogger to WordPress/LiveJournal/MovableType or vice versa


    Search Engine Optimization

    01. How to add Site map To Your Blogger Blog

    02. How to add Meta tags to your blog / website

    03. Swap title of your blog

    04. Search Engine Optimization plug-ins/add-ons for Firefox

    05. How to add separate Meta Tags for individual blog posts

    06. How to track your website's visitors and optimize your website for Search Engines

    07. What most people search for - Important keywords

    08. How to add your blog to Google Blog Search

    09. Show only titles in your Blog archives pages

    10. Check how fast your blog / web site loads (improve loading speed)

    11. A quick Search Engine Optimization tool

    12. Find and remove broken links from your blog

    13. Get better traffic from BlogExplosion


    Widgets And Hacks For Posts

    01. How to create a sticky post in Blogger

    02. How to make a scheduled post in Blogger

    03. How to add "Related Posts" widget below all your blog posts

    04. How to add Popular Posts widget to your blog

    05. Recent posts widget for Blogger

    06. How to add "Read More" tags to posts, and hide entire posts on the Home Page - Create Expandable Posts

    07. Scrolling text widget for recent posts

    08. Add your sign below all the posts in Blogger/BlogSpot blogs.

    09. Customized Popular posts widget for blogger


    Widgets and Hacks for comments

    01. Display commentators profile image in Blogger

    02. Recent posts widget for Blogger

    03. Top commentators widget for Blogger/BlogSpot blogs

    04. Easily moderate comments through email in Blogger

    05. Change "Post a Comment" link/text in your Blogger Blog


    06. Highlight Blog owner's / author's comments in the blog (i.e. your comments in your blog)

    07. Create a customized and better looking "About Me" or "Profile" widget


    Try These Widgets and Hacks

    01. How to show widgets only in homepage, or all posts or only in a specific page

    02. Blogger Help - Animated Flash Tag Cloud For Blogger

    03. How to add "Star Ratings" and "Customized Feedback" below your blog posts in Blogger blogs

    04. How to add Flash Clock in your HTML website

    05. How to add social networking buttons to posts in blogger

    06. How to embed Flash and JavaScript files in your blog posts

    07. How to embed songs or MP3 files in Blogger posts

    08. Add language translator widget / country flags in Blogger

    09. How to create a mutli-tab widget in Blogger/BlogSpot blogs

    10. How to add auto-scrolling widget [text and image slide shows] in Blogger

    11. Add falling snow flakes /flowers/leaves or balloons in Blogger Blogs

    12. Top EntrCard Droppers widget for Blogger blogs

    13. Show/Hide Text widgets, through JavaScript toggle method

    14. Create a Drop Down menu in your blog

    15. Add floating "Back To Top" button in your blog

    16. Add a fixed (floating) "Feedback button in your blog"

    17. Put a "Save As PDF" button/icon in your blog

    18. Add a text resizing widget to your blog

    19. Create an HTML Rollover button for your blog

    20. Show present date and time as simple text in your blog

    21. Add a JavaScript calendar to your blog

    22. New multi-tabbed widget for your blogs

    23. Create lightbox image display in your blog

    24. Encrypt or hide your HTML code

    25. Add a fish tank or aquarium to your blog

    26. Create a customized side menu for your blog

    27. Create a multi-level drop down menu for your blog

    28. Show Twitter updates on a image

    29. Send your blog updates to twitter automatically

    30. Add, Edit or Delete labels in Blogger

    31. Change or customize "Older Posts", "Newer Posts" and "Home" links in your blog


    Image or Picture Hacks

    01. How to embed pictures in Blogger Posts

    02. How to upload images in Blogger without changing the size of images

    03. Image hosting websites guide

    04. Free images stock-websites (search and download free images from these websites)

    05. Free Animated Gif Image/Picture creator

    06. Create round cornered / smooth edged pictures

    07. Uploading images in Blogger, in the original size

    08. How to show a different image on mouse hover

    09. Measure pixels length on screen (add-on for Firefox)

    10. Color picker, Eye dropper and Page zoomer - while working in a browser. (add-on for Firefox)

    11. 70+ background images collection

    12. Create fractal Background images for your blog

     
    Elegant de BlogMundi